Friday, January 30, 2009

Cooking with Michael and Friends

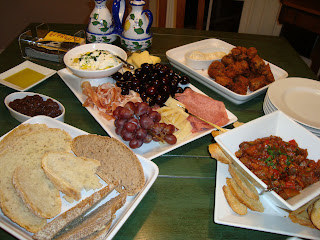
I love to cook and the Food Network is the inspiration for many of my meals. I have always wanted to take one episode and try to recreate it. This week I did it! The plan was to use Michael Chiarello's Let the Sunshine In episode and prepare the menu in my kitchen. Susan and I shopped for the ingredients locally with much success. The only thing missing was watercress. Dale joined us in the kitchen and we created an absolutely delicious meal.

I started the day before preparing the Frozen Ruby Reds. One word of caution, make sure you are going to be around for several hours so you can rake the frozen juice every hour or so. I made the mistake of leaving and called Kenny to do the raking. Unfortunately, it wasn't soon enough and I had to scrape out the ice crystals and put them in another container while the juice that was frozen solid thawed on the counter. After a while I was able to "rake" the juice and get the snow cone-like crystals.

After our shopping trip, we began the preparation. Susan started preparing the fruit for the Triple Orange Dessert Soup while I worked on the Lemon Braised Artichokes over Pasta. It took Susan quite some time to peel and section the oranges, grapefruit and tangerines. My task was to clean and quarter the artichokes. Thanks, Alessandra, for showing me how to prepare fresh artichokes in your Italian kitchen. This was a fairly simple and quick prep. I used fresh thyme from the garden for the braising. Once braised, they were set aside while Dale and I worked on the salad.
With the help of a mandoline, the fennel, carrots and onion were thinly sliced. Since we couldn't find any good watercress, we used spinach. The salad becomes better after sitting for a while so the vegetables can soak up the dressing. Kenny arrived in time to oversee the preparation of the Chicken with Roasted Lemon and Rosemary Sauce. The roasted lemons were amazing. By now, the kitchen was full of wonderful smells. The chicken and potatoes were browned and baked for 15 minutes.
Next time we will add to the baking time. The potatoes were still a little crunchy. During the baking, Kenny got started on mixing the drinks. We rimmed the glasses with salt and enjoyed the frozen drinks while the chicken and potatoes baked and the pasta was cooked.
Once the chicken and potatoes were baked, we made the sauce and finished the pasta. We decided to use only half of the lemon juice. The food smelled and looked wonderful. Everyone's favorite was the pasta – it could easily be served as the main dish with a salad and bread for a delicious meal. The Triple Orange Dessert Soup was much like our ambrosia without the coconut. It was a light finish to a meal that was all about citrus. Thanks to Michael, we had a wonderful meal and a great time in the kitchen!

Thursday, January 22, 2009

Chicken and Dumplings

Chicken and Dumplings are a favorite comfort food of the South. With the cold weather we have had, this is the perfect meal for a cold winter night. Add a simple fruit salad of apples, bananas, roasted pecans and mayonnaise and you have a meal that is sure to warm you all the way to your toes.


Chicken and Dumplings

1 chicken
Lots of water
Veggies and spices
Biscuit dough
Salt and pepper

The ingredients are simple - chicken, chicken stock and biscuits. Start by boiling the chicken in a pot of water filled with veggies and seasonings you have on hand. The veggies give the stock a lot of favor. This time I used celery, carrots, onion, parsley, sage, salt and pepper. Boil the chicken until tender. Once the chicken is done, remove the skin and bones. Chop or shred into bite-size pieces.

Now for the stock. Strain and refrigerate. Once cold, you can easily remove the fat that accumulates on the top. I like to cook my chicken the night before so it will be ready for supper the next night.

The dumplings are biscuits that are cut into small pieces and cooked with the chicken and stock until done. I like to use Martha White's biscuit mix but you can make your biscuits from scratch or use frozen biscuit dough or canned biscuits. Roll the dough out on a floured board and cut into small pieces. A pizza cutter works great for cutting the biscuit dough.
Bring the chicken and the stock to a boil in a large saucepan. Add the dumplings a few at a time to the stock. The flour on the dumplings will help to thicken the stock. The dumplings will float to the top. Continue to boil slowly.
When the dumplings sink, they are done! Season with salt and pepper to taste.
This is not a colorful dish, but the taste is simple and perfect for a cold winter night!

Italian Night

During our trip to Italy in November, Nan and I had the privilege of cooking with Alessandra in her kitchen in Cortona. It was a highlight of our trip. We shopped with Alessandra for the food and spent the day learning the techniques required to prepare an authentic Italian meal.

For the past couple of months, we have been perfecting our new skills. Steve, Cheryl, Bailey, Laura, Kenny and Edwin joined us as we prepared our favorites from the class. For the antipasti, we served Alessandra's Meatballs with proscuitto, a selection of cheeses, No Knead Bread, and the olive oil we purchased in Cortona.

The main dish was Shrimp and Asparagus Risotto. I'll be honest, the shrimp was delicious, the risotto was creamy, but there was something lacking in the flavor of the dish.

For dessert, we served Panna Cotta with Balsamic Strawberries and Blueberries . It reminded me of our meal with Leo in Cortona. Panna Cotta is one of those great desserts that you can make the day before. The taste is slightly sweet, but not heavy, with a wonderful vanilla flavor. The balsamic vinegar gives the fruit a tangy sweet finish. This will be one of my "go to" recipes for entertaining.

It was a great evening of good food, wine and friends! A special thanks to Laura and Bailey for the Georgia shrimp!

Thursday, January 8, 2009

Mushroom, Bacon and Cheese Strata

Our Christmas Brunch included this delicious Mushroom, Bacon and Cheese Strata. The combination of sauteed mushrooms, bacon, Gruyere cheese and ciabatta bread seasoned with fresh thyme creates a hearty strata that will become a favorite. Refrigerate any leftovers for breakfast the next day or a light lunch.

Mushroom, Bacon and Cheese Strata
1 loaf ciabatta bread, cut into 1-inch cubes (about 7 cups)
8 ounces mushrooms, sliced
8 ounces baby bella mushrooms, sliced
2 tablespoons butter
1 onion, chopped
8 - 10 slices bacon, cooked and crumbled
6 ounces Gruyere cheese, grated
3 cups non-fat milk
6 eggs, lightly beaten
2 tablespoons fresh thyme, chopped
1/2 teaspoon salt
1/4 teaspoon freshly ground black pepper

Preheat oven to 350 degrees F. Spread bread cubes onto a cookie sheet and bake for 20 minutes or until lightly toasted. Place cubes in a large bowl.

Melt butter in a large skillet and saute mushrooms and onion for 10 minutes or until all the liquid evaporates and the vegetables are tender. Add mixture to the bread and toss to combine thoroughly. Arrange 1/2 of the bread mixture in a greased 11 3/4" by 7 1/2" Pyrex dish. Top with half the cheese and half the bacon. Repeat layers.

Combine the milk, eggs, thyme, salt and pepper and stir with a whisk to combine. Pour milk mixture over the bread, cover and refrigerate for 8 hours or overnight.

Preheat oven to 350 degrees F. Remove strata from the refrigerator and let stand at room temperature for 15 minutes. Bake the strata, covered at 350 degrees F. for 30 minutes. Uncover and bake an additional 15 minutes or until set. Let stand 10 minutes before serving. Serves 8 - 10.

Star Provisions


A search for foods for our Italian Night dinner took us to Star Provisions, a wonderful shop on Howell Mill Road in Atlanta. This is a great place to buy cheese and proscuitto. Tim, the cheese guy, will gladly give you samples of cheese to make your selection easy. After buying our cheese and proscuitto, we headed to the deli for lunch. The Goat Cheese and Leek Focaccia was excellent!

Tuesday, January 6, 2009

No Knead Bread


No Knead Bread, so simple a 4-year old can make it! Well, maybe so, if they have the correct ingredients. One of the recipes featured in the Cooking with Cast Iron class at Williams-Sonoma was Rosemary and Lemon No Knead Bread. My task was to make the bread ahead of time and serve during the class. After many failed attempts, I discovered the solution was simply in the selection of ingredients.

It all begins with the flour. All-purpose flour works, if you select a hard wheat all-purpose flour such as King Arthur or Pillsbury. I used Martha White, an excellent soft wheat flour commonly used for cakes, pastries and quick breads. Soft wheat flours don't contain enough gluten, an essential protein needed for the bread to rise. Bread flour has a high gluten content and will give you the best results.

Next is the yeast. The recipe called for 1/4 teaspoon of active dry yeast. I bought Fleischmann's Active Dry Yeast and it took an entire packet - 2 1/4 teaspoons - to create a decent loaf of bread. What you should buy is Fleischmann's Rapid Rise yeast. Just 1/4 teaspoon of the yeast will give you a light, delicious bread.

Now comes the equipment. You will need a cast iron Dutch oven. I used a 2 3/4 quart Le Creuset Round Dutch Oven. You must heat the pot in a 450 degree F. oven for at least 30 minutes before baking the bread. The Dutch oven acts as a mini oven and creates the perfect environment for baking this light, crusty bread. Give this recipe a try and it will become a favorite!

No Knead Bread

3 cups bread flour
1/4 teaspoon Fleischmann's Rapid Rise yeast
1 1/4 teaspoon kosher salt
1 1/2 cups warm water
Cornmeal

Mix together the dry ingredients in a large bowl. Add the water and stir until the mixture forms a sticky ball. Cover the bowl with plastic wrap and place in a warm spot. Allow to rise for 12 - 18 hours.

Remove the ball from bowl to a floured surface. Fold the dough over 2 times (shape should be a rectangle) and allow to rest for 15 minutes. With floured hands, fold the long ends into the center. Then take the other ends and fold to the middle and place, seam side down on a tea towel dusted with cornmeal. Place in a bowl and allow to rise for 2 hours in a warm place.

Preheat the oven to 450 degrees F. Place a cast iron Dutch oven into the hot oven at least 30 minutes before baking the bread, Remove the Dutch oven from the oven, being very careful not to burn yourself. Move the bread from the bowl and place seam side up in the Dutch oven. Don't worry about extra flour or cornmeal on the bread, it will give the finished loaf rustic look.

Bake at 450 degrees F. for 30 minutes. Remove lid from the Dutch oven and cook for 15 - 25 minutes and the crust is browned. Cool on a wire rack.

The stiff dough before rising.
The dough after first rising.
Formed into ball for second rising.
Second rising.Success!

Cooking with Cast Iron

Last week I was asked to teach a technique class at Williams-Sonoma in Peachtree City. I have been working there during the holidays and was delighted to have the opportunity to share my love for cooking with the customers. My topic was "Cooking with Cast Iron". Cast iron is one of my favorite types of cookware. I have a wonderful collection of seasoned cast iron, thanks to our grandmothers and mothers, and several Le Creuset pots, so it was an subject of great interest.

Being a Southern cook, I use my cast iron for cornbread, stews, soups and roast beef. The goal of the class is to "make the most of your cast iron pieces with delightful yet simple recipes." And that I did!

The feature recipe was 40-Clove Garlic Chicken made using a Williams-Sonoma starter sauce. This is so simple and delicious. With a jar of the starter sauce and 1 chicken, you can create a tasty meal with very little effort. I served the chicken over rice to soak up the delicious sauce.

When cooking with cast iron, the main thing to remember is to avoid the temptation of cooking with too high a heat. Cast iron is an excellent conductor of heat and if you aren't careful, you will get the pan too hot and food will stick. When browning meat, heat the pan before adding the oil and meat. This will prevent the meat from sticking. Since cast iron is an excellent conductor, the heat is retained and for a long time even after removing from the heat source. This is great for keeping your food hot while serving but not so great when you have overheated your pan. So moderation is the key.